In a high-mix, low-volume environment, frequent fixture changes are the norm. But what happens when a fixture is not trammed in properly before machining? The result can be disastrous. Your stock and fixture sit at an angle relative to the machine table, and if there isn’t enough extra stock, your part may not meet specifications.
Fortunately, Mastercam Probing combined with a machine probe offers a smart solution. By measuring the angle of your material and rotating the machine’s work coordinate system (WCS), you can compensate for misalignment and produce accurate parts without re-fixturing.
Why This Matters
Incorrect fixturing can lead to:
- Parts out of tolerance
- Wasted material
- Increased setup time
Instead of tearing down and resetting your fixture, probing allows you to adapt the machine to the part, saving time and reducing scrap.
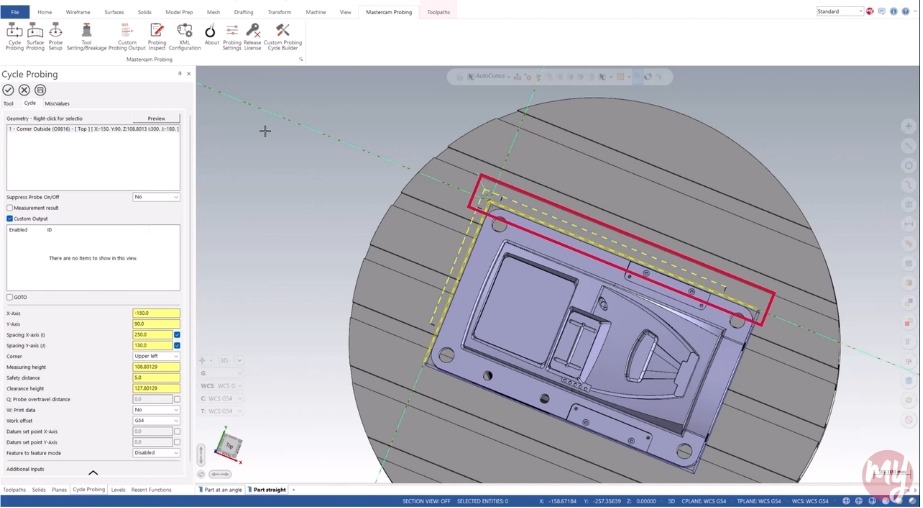
Step 1: Add a Probing Cycle
Start by adding a probing cycle to measure the angle at the back edge of your material. This data will let you rotate the WCS to match the material’s orientation.
Important: This method requires a post modification. It is a simple change your post developer can handle.
Step 2: Configure Measurement Settings
- Enable Measurement Results in your probing cycle.
- Turn on Deviation: X Surface Angle to capture the angle deviation.
- Assign this deviation to a variable (e.g., variable 699 in our example).
Note: Different probes and controllers use different variables—check your documentation.
Step 3: Enable G68 Rotation
In your cutting operation:
- Go to Miscellaneous Values.
- Turn on the switch for G68 for probe.
On Fanuc machines, G68 rotates the XY coordinate system about the WCS origin.
When set to 1, the post reads the value in variable 699 and applies it as a rotation before the toolpath.
Repeat this for all toolpaths where rotation is needed.
Step 4: Review Posted Code
Your posted code should:
- Run the probing routine.
- Output a line setting variable 699 to the measured angle.
- Insert a G68 command after the tool change to apply rotation.
- Include a G69 command at the end of each toolpath to cancel rotation before the next tool change.
Tip: Always include a safe Z move before applying or canceling rotations.
Watch Mastercam Probing in Action
Available for free to all maintained Mastercam CONNECT users:
Log in to myMastercam and watch the full Show Me video to see how Mastercam Probing can improve your machining today.
Not a Mastercam CONNECT user yet? Click here to learn how to unlock this video and gain access to even more exclusive content.