The holidays are a time for creativity – in the kitchen and in the shop. This year, our team at Mastercam decided to blend both worlds and cook up something unforgettable: a perfectly machined aluminum turkey.
But this wasn’t just any turkey. It was created using a blend of traditional toolpath strategies, clever model prep, and a secret ingredient: a new Mastercam technology set to launch after the new year.
Think of it as our new recipe for toolpaths: simple, clean, flexible, and intuitive.
Ingredients:
1 3D turkey model (STL)
1 block of aluminum (6061)
A pinch of fixturing (vise and pull studs)
A handful of cutting tools:
½” bull mill for roughing
3/8” ball mill for semifinishing
¼” ball mill for finishing
A dash of stock models for progress tracking
A teaspoon of simulation software (Vericut)
A drizzle of next-gen toolpath workflow (our secret sauce)
125 toolpaths
Cook time: 358 minutes
Step 1: Prep the Bird
Every great meal starts with prep – and so does every great part.
Our 3D turkey model came in as a heavy mesh full of lumpy facets and overlapping triangles. Before machining, it needed a deep clean.
• Use Mesh Refine to clean up the triangles
• Apply Decimation to reduce triangle count for roughing and improve simulation performance
• Convert to Mesh to lock in the cleaned geometry
Once your turkey is prepped, orient it on your fixture and define a generous stock model – always leave a bit of “skin” for trimming.
T️ip: Large, unoptimized meshes can slow your simulation to a crawl. A clean model keeps the oven preheated and ready.
Step 2: Season with Toolpaths
Now comes the fun part – layering your flavors.
Roughing: The Base Layer
Start with a hearty helping of Dynamic OptiRough. Take consistent bites, keep engagement high, and leave .020” to .050” for finishing. Before posting, sprinkle in an Arc Filter. This reduces excessive points in your toolpaths, resulting in leaner, more efficient G-code and smoother machine motion – perfect for those long, flowing 3+2 sweeps across curved geometry. Fewer toolpath points means smoother motion and a happier spindle.
Semi-Finishing: Smoothing the Surface
Follow with Raster or Equal Scallop to even out transitions. Add tool-shape fillets to avoid over engaging in sharp corners. This helps your finishing passes glide like butter later on.
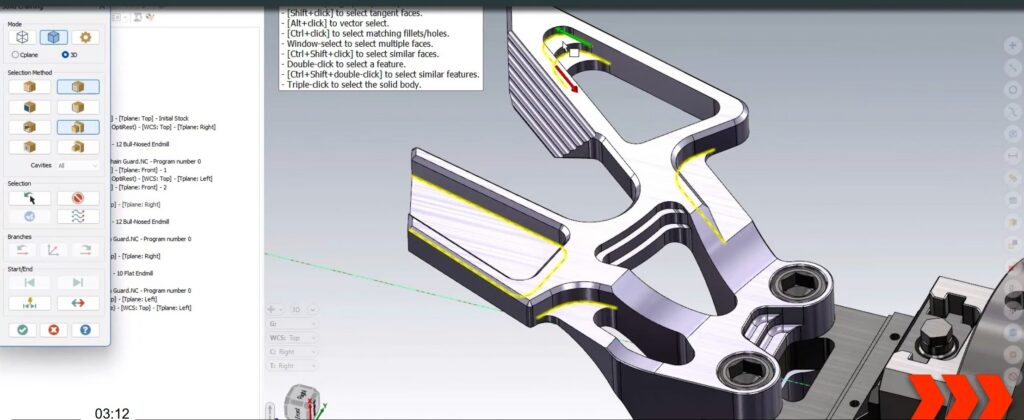
Finishing: The Secret Recipe
Here’s where the new technology shines.
The latest Mastercam workflow introduces a cleaner system – no confusing dialog boxes or buried options. Switching between 3-axis and 5-axis machining is now seamless, meaning you can tilt and trim around the turkey’s wings without starting over.
Detailing: Finishing Touches
From here on out, it is all gravy. Use multi-axis wireframe to blend toolpaths for a crisp final presentation.
Step 3: Mirror by Geometry
Why re-season the same side twice?
Use Mirror by Geometry to duplicate your setup and toolpaths for the turkey’s opposite half. Be sure to climb mill or your bird will be overcooked.
This ensures perfect symmetry, saves programming time, and doubles your productivity without doubling your effort.
Step 4: Simmer and Simulate with Vericut
Before you roast, always taste-test.
Run the entire operation through Vericut to verify your G-code and catch any collisions before they happen.
Vericut ensures every move is clean and collision-free, especially in complex multi-axis operations.
Step 5: Serve Hot
Once verified, post your code for the Okuma GENOS M560V (or Haas UMC500) and let the machine do the work.
Use stock models between operations to visualize progress and confirm there are no leftovers hiding in the corners.
When the spindle stops and the part cools, you’ll be left with a shimmering aluminum turkey worthy of any holiday display.
Chef’s Tips
• Do not change modify machining geometry once toolpaths are defined – changing it mid-process will add cooking time.
• Organize your project in Toolpath Groups – each with a Stock Model to start for quick visualization and simulation.
• You can substitute meshes for surfaces for smaller files and smoother machine motion.
• Take advantage of multi-core processing when recalculating toolpaths. Check your Multi Threading Manager often and adjust cooking time accordingly
• For extra flair, add Morph Between Curves or Flowline finishing to highlight the turkey’s natural contours.
The Final Presentation
This aluminum turkey represents more than a fun seasonal challenge. It showcases the evolving power and precision of Mastercam Mill.
By combining mesh cleanup, efficient toolpaths, Vericut simulation, and an all-new intuitive workflow, we turned a complex model into a beautifully machined centerpiece.
Whether you are cutting aluminum, steel, or something in between, these techniques serve up results that are perfectly finished and ready to impress.
Want to learn more?
This project demonstrates the evolving power of Mastercam Mill and Multiaxis solutions. Whether you’re machining aluminum, steel, or complex composites, these strategies deliver results that are accurate, efficient, and production ready.
Discover the capabilities of Mastercam Multiaxis: Multiaxis – mastercam.com
Explore the power of Mastercam Mill: Mill Programming Software Solutions | Mastercam